Thứ Hai, 26 tháng 12, 2011

JavaFX 2.0 Path Alternatives

In the post JavaFX 2.0 Christmas Tree (JavaFX 2.0 Shapes), I demonstrated using JavaFX 2.0's Path class in conjunction with MoveTo and LineTo to draw a simple Christmas tree. In this post, I look at using three alternatives to Path for drawing the Christmas tree.

The single class implementation (ChristmasTreePath.java) drawing the JavaFX 2.0 Christmas tree was nearly 350 lines in length (including comments and white space). In this post, I tried to keep the source structure roughly the same, but the three alternatives to Path (Polyline, Polygon, and SVGPath) lead to smaller class sizes (each about 210+ lines including comments and white space).

The easiest method to compare across the implementations is the method for drawing the tree stump. The next four code listings show the original Path-based implementation followed by the implementations using Polyline, Polygon, and SVGPath.

Stump Drawing with Path

/**
* Draw stump of tree.
*
* @return Path representing Christmas tree stump.
*/
private Path buildStumpPath()
{
final Path path = new Path();

int coordX = LEFT_STUMP_X;
int coordY = LEFT_STUMP_Y;
final MoveTo startingPoint = new MoveTo(coordX, coordY);
path.getElements().add(startingPoint);

coordY += STUMP_HEIGHT;
final LineTo leftStumpSide = new LineTo(coordX, coordY);
path.getElements().add(leftStumpSide);

coordX += STUMP_WIDTH;
final LineTo stumpBottom = new LineTo(coordX, coordY);
path.getElements().add(stumpBottom);

coordY -= STUMP_HEIGHT;
final LineTo rightStumpSide = new LineTo(coordX, coordY);
path.getElements().add(rightStumpSide);

coordX -= STUMP_WIDTH;
final LineTo topStump = new LineTo(coordX, coordY);
path.getElements().add(topStump);

path.setFill(Color.BROWN);

return path;
}
Stump Drawing with Polyline

/**
* Draw stump of tree.
*
* @return Polyline representing Christmas tree stump.
*/
private Polyline buildStumpPolyline()
{
int coordX = LEFT_STUMP_X;
int coordY = LEFT_STUMP_Y;

final double[] stumpPoints =
new double[]
{
coordX, coordY,
coordX, coordY += STUMP_HEIGHT,
coordX += STUMP_WIDTH, coordY,
coordX, coordY -= STUMP_HEIGHT,
coordX -= STUMP_WIDTH, coordY
};
final Polyline polyline = new Polyline(stumpPoints);

polyline.setFill(Color.BROWN);

return polyline;
}
Stump Drawing with Polygon

/**
* Draw stump of tree.
*
* @return Polygon representing Christmas tree stump.
*/
private Polygon buildStumpPolygon()
{
int coordX = LEFT_STUMP_X;
int coordY = LEFT_STUMP_Y;

final double[] stumpPoints =
new double[]
{
coordX, coordY,
coordX, coordY += STUMP_HEIGHT,
coordX += STUMP_WIDTH, coordY,
coordX, coordY -= STUMP_HEIGHT
};
final Polygon polygon = new Polygon(stumpPoints);

polygon.setFill(Color.BROWN);

return polygon;
}
Stump Drawing with SVGPath

/**
* Draw stump of tree.
*
* @return SVG Path representing Christmas tree stump.
*/
private SVGPath buildStumpSvgPath()
{
int coordX = LEFT_STUMP_X;
int coordY = LEFT_STUMP_Y;

final StringBuilder stumpPoints = new StringBuilder();
stumpPoints.append("M").append(coordX).append(",").append(coordY);
stumpPoints.append(" L").append(coordX).append(",").append(coordY += STUMP_HEIGHT);
stumpPoints.append(" L").append(coordX += STUMP_WIDTH).append(",").append(coordY);
stumpPoints.append(" L").append(coordX).append(",").append(coordY -= STUMP_HEIGHT);
stumpPoints.append(" L").append(coordX -= STUMP_WIDTH).append(",").append(coordY);

final SVGPath svgPath = new SVGPath();
svgPath.setContent(stumpPoints.toString());

svgPath.setFill(Color.BROWN);

return svgPath;
}

The portion for drawing the green part of the Christmas tree demonstrates even more significant differences between the Path implementation and the other three implementations. The four code listings comparing these implementations of drawing the green portion of the tree are shown next.

Drawing Tree with Path

/**
* Draw left side of the Christmas tree from top to bottom.
*
* @param path Path for left side of Christmas tree to be added to.
* @param startingX X portion of the starting coordinate.
* @param startingY Y portion of the starting coordinate.
* @return Coordinate with x and y values.
*/
private Coordinate drawLeftSide(
final Path path, final int startingX, final int startingY)
{
int coordX = startingX - DELTA_X;
int coordY = startingY + DELTA_Y;
final LineTo topLeft = new LineTo(coordX, coordY);
path.getElements().add(topLeft);

coordX += BRANCH_LENGTH;
final LineTo topLeftHorizontal = new LineTo(coordX, coordY);
path.getElements().add(topLeftHorizontal);

coordX -= DELTA_X;
coordY += DELTA_Y;
final LineTo secondLeft = new LineTo(coordX, coordY);
path.getElements().add(secondLeft);

coordX += BRANCH_LENGTH;
final LineTo secondLeftHorizontal = new LineTo(coordX, coordY);
path.getElements().add(secondLeftHorizontal);

coordX -= DELTA_X;
coordY += DELTA_Y;
final LineTo thirdLeft = new LineTo(coordX, coordY);
path.getElements().add(thirdLeft);

coordX += BRANCH_LENGTH;
final LineTo thirdLeftHorizontal = new LineTo(coordX, coordY);
path.getElements().add(thirdLeftHorizontal);

coordX -= DELTA_X;
coordY += DELTA_Y;
final LineTo fourthLeft = new LineTo(coordX, coordY);
path.getElements().add(fourthLeft);

coordX += BRANCH_LENGTH;
final LineTo fourthLeftHorizontal = new LineTo(coordX, coordY);
path.getElements().add(fourthLeftHorizontal);

return new Coordinate(coordX, coordY);
}

/**
* Draw right side of the Christmas tree from bottom to top.
*
* @param path Path for right side of Christmas tree to be added to.
* @param startingX X portion of the starting coordinate.
* @param startingY Y portion of the starting coordinate.
* @return Coordinate with x and y values.
*/
private Coordinate drawRightSide(
final Path path, final int startingX, final int startingY)
{
int coordX = startingX + BRANCH_LENGTH;
int coordY = startingY;
final LineTo bottomHorizontal = new LineTo(coordX, coordY);
path.getElements().add(bottomHorizontal);

coordX -= DELTA_X;
coordY -= DELTA_Y;
final LineTo bottomBranch = new LineTo(coordX, coordY);
path.getElements().add(bottomBranch);

coordX += BRANCH_LENGTH;
final LineTo secondHorizontal = new LineTo(coordX, coordY);
path.getElements().add(secondHorizontal);

coordX -= DELTA_X;
coordY -= DELTA_Y;
final LineTo secondBottomBranch = new LineTo(coordX, coordY);
path.getElements().add(secondBottomBranch);

coordX += BRANCH_LENGTH;
final LineTo thirdHorizontal = new LineTo(coordX, coordY);
path.getElements().add(thirdHorizontal);

coordX -= DELTA_X;
coordY -= DELTA_Y;
final LineTo thirdBottomBranch = new LineTo(coordX, coordY);
path.getElements().add(thirdBottomBranch);

coordX += BRANCH_LENGTH;
final LineTo fourthHorizontal = new LineTo(coordX, coordY);
path.getElements().add(fourthHorizontal);

coordX -= DELTA_X;
coordY -= DELTA_Y;
final LineTo fourthBottomBranch = new LineTo(coordX, coordY);
path.getElements().add(fourthBottomBranch);

return new Coordinate(coordX, coordY);
}

/**
* Build the exterior path of a Christmas Tree.
*
* @return Path representing the exterior of a simple Christmas tree drawing.
*/
private Path buildChristmasTreePath()
{
int coordX = TOP_CENTER_X;
int coordY = TOP_CENTER_Y;
final Path path = new Path();
final MoveTo startingPoint = new MoveTo(coordX, coordY);
path.getElements().add(startingPoint);

final Coordinate bottomLeft = drawLeftSide(path, coordX, coordY);
coordX = bottomLeft.x + TREE_BOTTOM_WIDTH;
coordY = bottomLeft.y;

final LineTo treeBottom = new LineTo(coordX, coordY);
path.getElements().add(treeBottom);

drawRightSide(path, coordX, coordY);

path.setFill(Color.GREEN);

return path;
}
Drawing Tree with Polyline

/**
* Build the exterior polyline of a Christmas Tree.
*
* @return Polyline representing the exterior of a simple Christmas tree drawing.
*/
private Polyline buildChristmasTreePolyline()
{
int coordX = TOP_CENTER_X;
int coordY = TOP_CENTER_Y;

final double[] treePoints =
new double[]
{
coordX, coordY,
coordX -= DELTA_X, coordY += DELTA_Y,
coordX += BRANCH_LENGTH, coordY,
coordX -= DELTA_X, coordY += DELTA_Y,
coordX += BRANCH_LENGTH, coordY,
coordX -= DELTA_X, coordY += DELTA_Y,
coordX += BRANCH_LENGTH, coordY,
coordX -= DELTA_X, coordY += DELTA_Y,
coordX += BRANCH_LENGTH, coordY,
coordX += TREE_BOTTOM_WIDTH, coordY,
coordX += BRANCH_LENGTH, coordY,
coordX -= DELTA_X, coordY -= DELTA_Y,
coordX += BRANCH_LENGTH, coordY,
coordX -= DELTA_X, coordY -= DELTA_Y,
coordX += BRANCH_LENGTH, coordY,
coordX -= DELTA_X, coordY -= DELTA_Y,
coordX += BRANCH_LENGTH, coordY,
coordX -= DELTA_X, coordY -= DELTA_Y
};

final Polyline polyline = new Polyline(treePoints);
polyline.setFill(Color.GREEN);

return polyline;
}
Drawing Tree with Polygon

/**
* Build the exterior polygon of a Christmas Tree.
*
* @return Polygon representing the exterior of a simple Christmas tree drawing.
*/
private Polygon buildChristmasTreePolygon()
{
int coordX = TOP_CENTER_X;
int coordY = TOP_CENTER_Y;

final double[] treePoints =
new double[]
{
coordX, coordY,
coordX -= DELTA_X, coordY += DELTA_Y,
coordX += BRANCH_LENGTH, coordY,
coordX -= DELTA_X, coordY += DELTA_Y,
coordX += BRANCH_LENGTH, coordY,
coordX -= DELTA_X, coordY += DELTA_Y,
coordX += BRANCH_LENGTH, coordY,
coordX -= DELTA_X, coordY += DELTA_Y,
coordX += BRANCH_LENGTH, coordY,
coordX += TREE_BOTTOM_WIDTH, coordY,
coordX += BRANCH_LENGTH, coordY,
coordX -= DELTA_X, coordY -= DELTA_Y,
coordX += BRANCH_LENGTH, coordY,
coordX -= DELTA_X, coordY -= DELTA_Y,
coordX += BRANCH_LENGTH, coordY,
coordX -= DELTA_X, coordY -= DELTA_Y,
coordX += BRANCH_LENGTH, coordY,
coordX -= DELTA_X, coordY -= DELTA_Y
};

final Polygon polygon = new Polygon(treePoints);
polygon.setFill(Color.GREEN);

return polygon;
}
Drawing Tree with SVGPath

/**
* Build the exterior SVG Path of a Christmas Tree.
*
* @return SVG Path representing the exterior of a simple Christmas tree drawing.
*/
private SVGPath buildChristmasTreeSvgPath()
{
int coordX = TOP_CENTER_X;
int coordY = TOP_CENTER_Y;

final StringBuilder treePoints = new StringBuilder();
treePoints.append("M").append(coordX).append(",").append(coordY);
treePoints.append(" L").append(coordX -= DELTA_X).append(",")
.append(coordY += DELTA_Y);
treePoints.append(" L").append(coordX += BRANCH_LENGTH).append(",")
.append(coordY);
treePoints.append(" L").append(coordX -= DELTA_X).append(",")
.append(coordY += DELTA_Y);
treePoints.append(" L").append(coordX += BRANCH_LENGTH).append(",")
.append(coordY);
treePoints.append(" L").append(coordX -= DELTA_X).append(",")
.append(coordY += DELTA_Y);
treePoints.append(" L").append(coordX += BRANCH_LENGTH).append(",")
.append(coordY);
treePoints.append(" L").append(coordX -= DELTA_X).append(",")
.append(coordY += DELTA_Y);
treePoints.append(" L").append(coordX += BRANCH_LENGTH).append(",")
.append(coordY);
treePoints.append(" L").append(coordX += TREE_BOTTOM_WIDTH).append(",")
.append(coordY);
treePoints.append(" L").append(coordX += BRANCH_LENGTH).append(",")
.append(coordY);
treePoints.append(" L").append(coordX -= DELTA_X).append(",")
.append(coordY -= DELTA_Y);
treePoints.append(" L").append(coordX += BRANCH_LENGTH).append(",")
.append(coordY);
treePoints.append(" L").append(coordX -= DELTA_X).append(",")
.append(coordY -= DELTA_Y);
treePoints.append(" L").append(coordX += BRANCH_LENGTH).append(",")
.append(coordY);
treePoints.append(" L").append(coordX -= DELTA_X).append(",")
.append(coordY -= DELTA_Y);
treePoints.append(" L").append(coordX += BRANCH_LENGTH).append(",")
.append(coordY);
treePoints.append(" L").append(coordX -= DELTA_X).append(",")
.append(coordY -= DELTA_Y);

final SVGPath svgPath = new SVGPath();
svgPath.setContent(treePoints.toString());
svgPath.setFill(Color.GREEN);

return svgPath;
}

The result of running all four of these implementations is the same. There are advantages to the alternatives to Path, but in many ways the differences are a matter of taste. If hard-coded numbers are used, the alternatives to Path become very succinct.

Guava Release 11's IntMath

As I stated earlier in the post Sneaking a Peek at Guava Release 11, Guava Release 11 provides numerous new classes including several classes specifically related to mathematical operations. In this post, I look at one of these that is targeted at integer math: Guava's IntMath.

As stated in my previous post, com.google.common.math.IntMath is largely based on Henry S. Warren, Jr.'s Hacker's Delight. As the class name indicates, the operations of this class are focused on "arithmetic on values of type int."

The next screen snapshot shows the methods and static attributes supported by IntMath as listed by javap:

For convenience, I have listed a text version of the above javap output here.


Compiled from "IntMath.java"
public final class com.google.common.math.IntMath {
static final int MAX_POWER_OF_SQRT2_UNSIGNED;
static final int[] POWERS_OF_10;
static final int[] HALF_POWERS_OF_10;
static final int FLOOR_SQRT_MAX_INT;
static final int[] FACTORIALS;
static int[] BIGGEST_BINOMIALS;
public static boolean isPowerOfTwo(int);
public static int log2(int, java.math.RoundingMode);
public static int log10(int, java.math.RoundingMode);
public static int pow(int, int);
public static int sqrt(int, java.math.RoundingMode);
public static int divide(int, int, java.math.RoundingMode);
public static int mod(int, int);
public static int gcd(int, int);
public static int checkedAdd(int, int);
public static int checkedSubtract(int, int);
public static int checkedMultiply(int, int);
public static int checkedPow(int, int);
public static int factorial(int);
public static int binomial(int, int);
static {};
}

As the image and text output above indicate, the IntMath class has much to offer in terms of functionality related to integer arithmetic. The remainder of this post will demonstrate this.

Factorial calculation is commonly implemented in software development examples, especially in academic contexts such as illustrating recursion. The blog post Implementing the Factorial Function Using Java and Guava is devoted to different implementations of factorial implemented in Java and Guava. Guava Release 11 now provides a method for calculating factorial in IntMath.factorial(int).

Guava's IntMath.factorial(int) Demonstrated

/**
* Demonstrate factorial calculation.
*/
public static void demoFactorial()
{
final int x = 5;
final int factorial = IntMath.factorial(x);
out.println("Factorial of x=" + x + " is " + factorial);
}

Another often mathematical operation supported by Guava Release 11 is the calculation of the binomial coefficient via IntMath.binomial(int,int).

Guava's IntMath.binomial(int,int) Demonstrated

/**
* Demonstrate binomial Coefficient calculation
* (http://en.wikipedia.org/wiki/Binomial_coefficient).
*/
public static void demoBinomialCoefficient()
{
final int n = 5;
final int k = 3;
final int binomialCoefficient = IntMath.binomial(n, k);
out.println(
"Binomial Coefficient of n=" + n + " and k=" + k + " is "
+ binomialCoefficient);
}

Guava Release 11 also adds a method for calculating the greatest common divisor of two provided integers.

Guava's IntMath.gcd(int,int) Demonstrated

/**
* Demonstrate calculation of greatest common factor (GCF) [called greatest
* common divisor here].
*/
public static void demoGreatestCommonFactor()
{
final int x = 30;
final int y = 45;
final int gcf = IntMath.gcd(x, y);
out.println("GCF of " + x + " and " + y + " is " + gcf);
}

Guava Release 11 provides a method for calculating an integer square root of a provided integer, rounding to the integer result when needed based on the provided RoundingMode. The fact that the result of the square root function is an integer distinguishes this method from Math.sqrt(double).

Guava's IntMath.sqrt(int) Demonstrated

/**
* Demonstrate calculation of square roots.
*/
public static void demoSquareRoot()
{
final int x = 16;
final int sqrtX = IntMath.sqrt(x, RoundingMode.HALF_EVEN);
out.println("Square root of " + x + " is " + sqrtX);
final int y = 25;
final int sqrtY = IntMath.sqrt(y, RoundingMode.HALF_EVEN);
out.println("Square root of " + y + " is " + sqrtY);
}

Guava Release 11's IntMath provides the method pow(int,int) for the first integer multiplied by itself the number of times expressed by the second integer (similar to Math.pow(double,double), but accepting and returning integers rather than doubles.). The IntMath.pow(int,int) method provides handling for situations in which the operation would normally result in an overflow. In such a situation, according to the method's Javadoc, the method will return a result that "will be equal to BigInteger.valueOf(b).pow(k).intValue()."

Guava's IntMath.pow(int,int) Demonstrated

/**
* Demonstrate exponential power calculation.
*/
public static void demoExponentialPower()
{
final int base = 2;
final int exponent = 5;
final int result = IntMath.pow(base, exponent);
out.println(base + " to power of " + exponent + " is " + result);
}

A particularly interesting method that Guava Release 11 provides that could be especially useful in certain software development and computer contexts is the method IntMath.isPowerOfTwo(int). This method returns a boolean indicating whether the provided integer is evenly divisible (no remainder) by two.

Guava's IntMath.isPowerOfTwo(int) Demonstrated

/**
* Demonstrate determination of whether an integer is a power of two.
*/
public static void demoIsPowerOfTwo()
{
final int x = 16;
out.println(x + (IntMath.isPowerOfTwo(x) ? " IS " : " is NOT " ) + " a power of two.");
final int y = 31;
out.println(y + (IntMath.isPowerOfTwo(y) ? " IS " : " is NOT " ) + " a power of two.");
}

Guava's IntMath class provides two methods for performing logarithmic calculations, specifically focusing on the common logarithm (base 10) and the binary logarithm (base 2). Both of these are demonstrated in the next code listing.

Guava's IntMath.log10(int,RoundingMode) and IntMath.log2(int,RoundingMode) Demonstrated

/**
* Demonstrate IntMath.log10 and IntMath.log2.
*/
public static void demoLogarithmicFunctions()
{
final int x = 10000000;
final int resultX = IntMath.log10(x, RoundingMode.HALF_EVEN);
out.println("Logarithm (base 10) of " + x + " is " + resultX);
final int y = 32;
final int resultY = IntMath.log2(y, RoundingMode.HALF_EVEN);
out.println("Logarithm (base 2) of " + y + " is " + resultY);
}

Guava Release 11's IntMath.divide(int,int,RoundingMode) allows for integer division in which the type of rounding used in the division can be specified as part of the call. This is more flexible than direct Java integer division which always rounds the quotient down to the lower integer (floor).

Guava's IntMath.divide(int,int,RoundingMode) Demonstrated

/**
* Demonstrate division using IntMath.divide.
*/
public static void demoDivision()
{
final int dividend = 30;
final int divisor = 10;
final int quotient = IntMath.divide(dividend, divisor, RoundingMode.HALF_EVEN);
out.println(dividend + " / " + divisor + " = " + quotient);
}

I mentioned previously that Guava Release 11's IntMath.pow(int,int) would handle overflow situations by returning "BigInteger.valueOf(b).pow(k).intValue()" where 'b' is the first integer (base) and 'k' is the second integer (power/exponent). In some cases, it may be preferable to have an exception thrown when the overflow situation occurs rather than "hiding" the issue. In such cases, Guava Release 11's IntMath.checkedPow(int,int) is desirable because it will throw an ArithmeticException if the operation results in an overflow.

IntMath.checkedPow(int,int) Demonstrated

/**
* Demonstrate Guava Release 11's checked power method and compare it to
* other common approaches for determining base multiplied by itself exponent
* number of times.
*/
public static void demoCheckedPower()
{
try
{
final int base = 2;
final int exponent = 4;
final int result = IntMath.checkedPow(base, exponent);
out.println("IntMath.checkedPow: " + base + "^" + exponent + " = " + result);

out.println(
"IntMath.pow: " + Integer.MAX_VALUE + "^2 = " +
+ IntMath.pow(Integer.MAX_VALUE, 2));
out.println(
"Math.pow(int,int): " + Integer.MAX_VALUE + "^2 = "
+ Math.pow(Integer.MAX_VALUE, 2));
out.println("Multiplied: " + Integer.MAX_VALUE*Integer.MAX_VALUE);
out.print("IntMath.checkedPow: " + Integer.MAX_VALUE + "^2 = ");
out.println(IntMath.checkedPow(Integer.MAX_VALUE, 2));
}
catch (Exception ex)
{
err.println("Exception during power: " + ex.toString());
}
}

Guava Release 11's IntMath class provides three more "checked" methods that throw an ArithmeticException when the given mathematical operation results in an overflow condition. These methods are for addition, substraction, and multiplication and are respectively called IntMath.checkedAdd(int,int), IntMath.checkedSubtract(int,int), and IntMath.checkedMultiply(int,int). As discussed in conjunction with IntMath.checkedPow(int,int), the advantage of this occurs in situations where it is better to have an exception and know overflow occurred than to blindly operate on an erroneous value due to an overflow condition.

Guava's checkedAdd(int,int), checkedSubtract(int,int), and checkedMultiply(int,int) Demonstrated

/**
* Demonstrate Guava Release 11's checked addition method.
*/
public static void demoCheckedAddition()
{
try
{
final int augend = 20;
final int addend = 10;
final int sum = IntMath.checkedAdd(augend, addend);
out.println(augend + " + " + addend + " = " + sum);

final int overflowSum = IntMath.checkedAdd(Integer.MAX_VALUE, 1);
out.println(Integer.MAX_VALUE + " + 1 = " + overflowSum);
}
catch (Exception ex)
{
err.println("Exception during addition: " + ex.toString());
}
}

/**
* Demonstrate Guava Release 11's checked subtraction method.
*/
public static void demoCheckedSubtraction()
{
try
{
final int minuend = 30;
final int subtrahend = 20;
final int difference = IntMath.checkedSubtract(minuend, subtrahend);
out.println(minuend + " - " + subtrahend + " = " + difference);

final int overflowDifference = IntMath.checkedSubtract(Integer.MIN_VALUE, 1);
out.println(Integer.MIN_VALUE + " - 1 = " + overflowDifference);
}
catch (Exception ex)
{
err.println("Exception during subtraction: " + ex.toString());
}
}

/**
* Demonstrate Guava Release 11's checked multiplication method.
*/
public static void demoCheckedMultiplication()
{
try
{
final int factor1 = 3;
final int factor2 = 10;
final int product = IntMath.checkedMultiply(factor1, factor2);
out.println(factor1 + " * " + factor2 + " = " + product);

final int overflowProduct = IntMath.checkedMultiply(Integer.MAX_VALUE, 2);
out.println(Integer.MAX_VALUE + " * 2 = " + overflowProduct);
}
catch (Exception ex)
{
err.println("Exception during multiplication: " + ex.toString());
}
}

The blog post Handling Very Large Numbers in Java talks about issues with large numbers in Java and the overflow that can occur. As this post recommends, use of BigInteger and BigDecimal is often recommended for such situations. However, these new Guava IntMath "checked" methods provide another alternative for the Java developer who wants to deal with integers, but know when overflow has occurred.

I have shown simple examples of using most of the methods of the new IntMath class in Guava Release 11 [I did not discuss or show IntMath.mod(int,int)]. The next code listing ties all of the above examples together and is followed by the output from running that code listing.

UsingIntMath.java

package dustin.examples;

import static java.lang.System.err;
import static java.lang.System.out;

import com.google.common.math.IntMath;
import java.math.RoundingMode;

/**
* Simple examples of using Guava Release 11's {@code IntMath} class.
*
* @author Dustin
*/
public class UsingIntMath
{
/**
* Demonstrate binomial Coefficient calculation
* (http://en.wikipedia.org/wiki/Binomial_coefficient).
*/
public static void demoBinomialCoefficient()
{
final int n = 5;
final int k = 3;
final int binomialCoefficient = IntMath.binomial(n, k);
out.println(
"Binomial Coefficient of n=" + n + " and k=" + k + " is "
+ binomialCoefficient);
}

/**
* Demonstrate factorial calculation.
*/
public static void demoFactorial()
{
final int x = 5;
final int factorial = IntMath.factorial(x);
out.println("Factorial of x=" + x + " is " + factorial);
}

/**
* Demonstrate calculation of greatest common factor (GCF) [called greatest
* common divisor here].
*/
public static void demoGreatestCommonFactor()
{
final int x = 30;
final int y = 45;
final int gcf = IntMath.gcd(x, y);
out.println("GCF of " + x + " and " + y + " is " + gcf);
}

/**
* Demonstrate calculation of square roots.
*/
public static void demoSquareRoot()
{
final int x = 16;
final int sqrtX = IntMath.sqrt(x, RoundingMode.HALF_EVEN);
out.println("Square root of " + x + " is " + sqrtX);
final int y = 25;
final int sqrtY = IntMath.sqrt(y, RoundingMode.HALF_EVEN);
out.println("Square root of " + y + " is " + sqrtY);
}

/**
* Demonstrate determination of whether an integer is a power of two.
*/
public static void demoIsPowerOfTwo()
{
final int x = 16;
out.println(x + (IntMath.isPowerOfTwo(x) ? " IS " : " is NOT " ) + " a power of two.");
final int y = 31;
out.println(y + (IntMath.isPowerOfTwo(y) ? " IS " : " is NOT " ) + " a power of two.");
}

/**
* Demonstrate exponential power calculation.
*/
public static void demoExponentialPower()
{
final int base = 2;
final int exponent = 5;
final int result = IntMath.pow(base, exponent);
out.println(base + " to power of " + exponent + " is " + result);
}

/**
* Demonstrate IntMath.log10 and IntMath.log2.
*/
public static void demoLogarithmicFunctions()
{
final int x = 10000000;
final int resultX = IntMath.log10(x, RoundingMode.HALF_EVEN);
out.println("Logarithm (base 10) of " + x + " is " + resultX);
final int y = 32;
final int resultY = IntMath.log2(y, RoundingMode.HALF_EVEN);
out.println("Logarithm (base 2) of " + y + " is " + resultY);
}

/**
* Demonstrate Guava Release 11's checked addition method.
*/
public static void demoCheckedAddition()
{
try
{
final int augend = 20;
final int addend = 10;
final int sum = IntMath.checkedAdd(augend, addend);
out.println(augend + " + " + addend + " = " + sum);

final int overflowSum = IntMath.checkedAdd(Integer.MAX_VALUE, 1);
out.println(Integer.MAX_VALUE + " + 1 = " + overflowSum);
}
catch (Exception ex)
{
err.println("Exception during addition: " + ex.toString());
}
}

/**
* Demonstrate Guava Release 11's checked subtraction method.
*/
public static void demoCheckedSubtraction()
{
try
{
final int minuend = 30;
final int subtrahend = 20;
final int difference = IntMath.checkedSubtract(minuend, subtrahend);
out.println(minuend + " - " + subtrahend + " = " + difference);

final int overflowDifference = IntMath.checkedSubtract(Integer.MIN_VALUE, 1);
out.println(Integer.MIN_VALUE + " - 1 = " + overflowDifference);
}
catch (Exception ex)
{
err.println("Exception during subtraction: " + ex.toString());
}
}

/**
* Demonstrate Guava Release 11's checked multiplication method.
*/
public static void demoCheckedMultiplication()
{
try
{
final int factor1 = 3;
final int factor2 = 10;
final int product = IntMath.checkedMultiply(factor1, factor2);
out.println(factor1 + " * " + factor2 + " = " + product);

final int overflowProduct = IntMath.checkedMultiply(Integer.MAX_VALUE, 2);
out.println(Integer.MAX_VALUE + " * 2 = " + overflowProduct);
}
catch (Exception ex)
{
err.println("Exception during multiplication: " + ex.toString());
}
}

/**
* Demonstrate Guava Release 11's checked power method and compare it to
* other common approaches for determining base multiplied by itself exponent
* number of times.
*/
public static void demoCheckedPower()
{
try
{
final int base = 2;
final int exponent = 4;
final int result = IntMath.checkedPow(base, exponent);
out.println("IntMath.checkedPow: " + base + "^" + exponent + " = " + result);

out.println(
"IntMath.pow: " + Integer.MAX_VALUE + "^2 = " +
+ IntMath.pow(Integer.MAX_VALUE, 2));
out.println(
"Math.pow(int,int): " + Integer.MAX_VALUE + "^2 = "
+ Math.pow(Integer.MAX_VALUE, 2));
out.println("Multiplied: " + Integer.MAX_VALUE*Integer.MAX_VALUE);
out.print("IntMath.checkedPow: " + Integer.MAX_VALUE + "^2 = ");
out.println(IntMath.checkedPow(Integer.MAX_VALUE, 2));
}
catch (Exception ex)
{
err.println("Exception during power: " + ex.toString());
}
}

/**
* Demonstrate division using IntMath.divide.
*/
public static void demoDivision()
{
final int dividend = 30;
final int divisor = 10;
final int quotient = IntMath.divide(dividend, divisor, RoundingMode.HALF_EVEN);
out.println(dividend + " / " + divisor + " = " + quotient);
}

/**
* Main function for demonstrating Guava Release 11's {@code IntMath} class.
*
* @param arguments Command-line arguments; none expected.
*/
public static void main(final String[] arguments)
{
demoBinomialCoefficient();
demoFactorial();
demoGreatestCommonFactor();
demoSquareRoot();
demoIsPowerOfTwo();
demoExponentialPower();
demoLogarithmicFunctions();
demoCheckedAddition();
demoCheckedSubtraction();
demoCheckedMultiplication();
demoCheckedPower();
demoDivision();
}
}

This blog post has attempted to demonstrate the usefulness and ease-of-use provided by Guava Release 11's IntMath class. This class provides numerous convenient method for simplifying common mathematical operations on integers. Guava Release 11 provides essentially the same methods in the com.google.common.math package for longs (LongMath) and similar methods for double's (DoubleMath) and BigIntegers (BigIntegerMath).

Thứ Bảy, 24 tháng 12, 2011

JavaFX 2.0 Christmas Tree (JavaFX 2.0 Shapes)

The JavaFX 2.0 package javafx.scene.shape contains useful classes for drawing shapes in JavaFX. Given that today is Christmas Eve, it seems apropos to demonstrate some of the package's classes that can be used to draw a Christmas tree.

In my example for this post, I make heavy use of JavaFX 2.0's javafx.scene.shape.Path class, but I could have used javafx.scene.shape.Polyline, javafx.scene.shape.Polygon, or javafx.scene.shape.SVGPath to accomplish the same thing (and in arguably easier fashion). Because I use the Path approach, I also make heavy use of javafx.scene.shape.LineTo and javafx.scene.shape.MoveTo. I use the path approach to build the outline of the main portion of the tree and then again to build the outline of the stump. The main part of the tree is filled with green fill color and the stump similarly is filled with brown fill color.

The bulbs of the Christmas tree are circles created using JavaFX 2.0's javafx.scene.shape.Circle class. A MouseEvent handler is placed on each bulb such that clicking on a bulb leads to it increasing in size and showing the glow effect.

There is also some text added to the Christmas tree that makes use of the JavaFX 2.0 text APIs I discussed in my previous post Simple JavaFX 2.0 Text Example.

The code listing for ChristmasTreePath.java is shown next.


package dustin.examples;

import javafx.application.Application;
import javafx.event.EventHandler;
import javafx.scene.Group;
import javafx.scene.Scene;
import javafx.scene.effect.Glow;
import javafx.scene.input.MouseEvent;
import javafx.scene.paint.Color;
import javafx.scene.paint.Paint;
import javafx.scene.shape.*;
import javafx.scene.text.Font;
import javafx.scene.text.Text;
import javafx.stage.Stage;

/**
* Simple example of using JavaFX 2.0's Path to create a simple Christmas tree.
*
* @author Dustin
*/
public class ChristmasTreePath extends Application
{
/** Number of branches on Christmas tree. */
private final static int NUMBER_BRANCHES = 4;
/** X-coordinate of very top of Christmas tree. */
private final static int TOP_CENTER_X = 400;
/** Y-coordinate of very top of Christmas tree. */
private final static int TOP_CENTER_Y = 25;
/** Horizontal distance to end of each branch. */
private final static int DELTA_X = 125;
/** Vertical distance to end of each branch. */
private final static int DELTA_Y = 100;
/** Length of each branch as measured on bottom of branch. */
private final static int BRANCH_LENGTH = 75;
/** Width of tree stump. */
private final static int STUMP_WIDTH = 100;
/** Height of tree stump. */
private final static int STUMP_HEIGHT = 150;
/** X-coordinate of top left corner of tree stump. */
private final static int LEFT_STUMP_X = TOP_CENTER_X - STUMP_WIDTH/2;
/** Y-coordinate of top left corner of tree stump. */
private final static int LEFT_STUMP_Y = TOP_CENTER_Y + DELTA_Y * NUMBER_BRANCHES;
/** Width of Christmas tree bottom. */
private final static int TREE_BOTTOM_WIDTH = (DELTA_X-BRANCH_LENGTH) * NUMBER_BRANCHES * 2;

/**
* Simple representation of (x, y) coordinate.
*/
private static class Coordinate
{
/** Horizontal portion of coordinate. */
final private int x;

/** Vertical portion of coordinate. */
final private int y;

/**
* Create instance of me with 'x' and 'y' components.
*
* @param newX The horizontal portion of the coordinate.
* @param newY The vertical portion of the coordinate.
*/
public Coordinate(final int newX, final int newY)
{
this.x = newX;
this.y = newY;
}

/**
* Provide String representation of this coordinate.
*
* @return String representation of this coordinate in form "(x, y)".
*/
@Override
public String toString()
{
return "(" + this.x + ", " + this.y + ")";
}
}

/**
* Draw left side of the Christmas tree from top to bottom.
*
* @param path Path for left side of Christmas tree to be added to.
* @param startingX X portion of the starting coordinate.
* @param startingY Y portion of the starting coordinate.
* @return Coordinate with x and y values.
*/
private Coordinate drawLeftSide(
final Path path, final int startingX, final int startingY)
{
int coordX = startingX - DELTA_X;
int coordY = startingY + DELTA_Y;
final LineTo topLeft = new LineTo(coordX, coordY);
path.getElements().add(topLeft);

coordX += BRANCH_LENGTH;
final LineTo topLeftHorizontal = new LineTo(coordX, coordY);
path.getElements().add(topLeftHorizontal);

coordX -= DELTA_X;
coordY += DELTA_Y;
final LineTo secondLeft = new LineTo(coordX, coordY);
path.getElements().add(secondLeft);

coordX += BRANCH_LENGTH;
final LineTo secondLeftHorizontal = new LineTo(coordX, coordY);
path.getElements().add(secondLeftHorizontal);

coordX -= DELTA_X;
coordY += DELTA_Y;
final LineTo thirdLeft = new LineTo(coordX, coordY);
path.getElements().add(thirdLeft);

coordX += BRANCH_LENGTH;
final LineTo thirdLeftHorizontal = new LineTo(coordX, coordY);
path.getElements().add(thirdLeftHorizontal);

coordX -= DELTA_X;
coordY += DELTA_Y;
final LineTo fourthLeft = new LineTo(coordX, coordY);
path.getElements().add(fourthLeft);

coordX += BRANCH_LENGTH;
final LineTo fourthLeftHorizontal = new LineTo(coordX, coordY);
path.getElements().add(fourthLeftHorizontal);

return new Coordinate(coordX, coordY);
}

/**
* Draw right side of the Christmas tree from bottom to top.
*
* @param path Path for right side of Christmas tree to be added to.
* @param startingX X portion of the starting coordinate.
* @param startingY Y portion of the starting coordinate.
* @return Coordinate with x and y values.
*/
private Coordinate drawRightSide(
final Path path, final int startingX, final int startingY)
{
int coordX = startingX + BRANCH_LENGTH;
int coordY = startingY;
final LineTo bottomHorizontal = new LineTo(coordX, coordY);
path.getElements().add(bottomHorizontal);

coordX -= DELTA_X;
coordY -= DELTA_Y;
final LineTo bottomBranch = new LineTo(coordX, coordY);
path.getElements().add(bottomBranch);

coordX += BRANCH_LENGTH;
final LineTo secondHorizontal = new LineTo(coordX, coordY);
path.getElements().add(secondHorizontal);

coordX -= DELTA_X;
coordY -= DELTA_Y;
final LineTo secondBottomBranch = new LineTo(coordX, coordY);
path.getElements().add(secondBottomBranch);

coordX += BRANCH_LENGTH;
final LineTo thirdHorizontal = new LineTo(coordX, coordY);
path.getElements().add(thirdHorizontal);

coordX -= DELTA_X;
coordY -= DELTA_Y;
final LineTo thirdBottomBranch = new LineTo(coordX, coordY);
path.getElements().add(thirdBottomBranch);

coordX += BRANCH_LENGTH;
final LineTo fourthHorizontal = new LineTo(coordX, coordY);
path.getElements().add(fourthHorizontal);

coordX -= DELTA_X;
coordY -= DELTA_Y;
final LineTo fourthBottomBranch = new LineTo(coordX, coordY);
path.getElements().add(fourthBottomBranch);

return new Coordinate(coordX, coordY);
}

/**
* Draw stump of tree.
*
* @return Path representing Christmas tree stump.
*/
private Path buildStumpPath()
{
final Path path = new Path();

int coordX = LEFT_STUMP_X;
int coordY = LEFT_STUMP_Y;
final MoveTo startingPoint = new MoveTo(coordX, coordY);
path.getElements().add(startingPoint);

coordY += STUMP_HEIGHT;
final LineTo leftStumpSide = new LineTo(coordX, coordY);
path.getElements().add(leftStumpSide);

coordX += STUMP_WIDTH;
final LineTo stumpBottom = new LineTo(coordX, coordY);
path.getElements().add(stumpBottom);

coordY -= STUMP_HEIGHT;
final LineTo rightStumpSide = new LineTo(coordX, coordY);
path.getElements().add(rightStumpSide);

coordX -= STUMP_WIDTH;
final LineTo topStump = new LineTo(coordX, coordY);
path.getElements().add(topStump);

path.setFill(Color.BROWN);

return path;
}

/**
* Build the exterior path of a Christmas Tree.
*
* @return Path representing the exterior of a simple Christmas tree drawing.
*/
private Path buildChristmasTreePath()
{
int coordX = TOP_CENTER_X;
int coordY = TOP_CENTER_Y;
final Path path = new Path();
final MoveTo startingPoint = new MoveTo(coordX, coordY);
path.getElements().add(startingPoint);

final Coordinate bottomLeft = drawLeftSide(path, coordX, coordY);
coordX = bottomLeft.x + TREE_BOTTOM_WIDTH;
coordY = bottomLeft.y;

final LineTo treeBottom = new LineTo(coordX, coordY);
path.getElements().add(treeBottom);

drawRightSide(path, coordX, coordY);

path.setFill(Color.GREEN);

return path;
}

/**
* Create a bulb based on provided parameters and associate a MouseEvent to
* it such that clicking on a bulb will increase its size and enable the glow
* effect.
*
* @param centerX X-coordinate of center of bulb.
* @param centerY Y-coordinate of center of bulb.
* @param radius Radius of bulb.
* @param paint Paint/color instance to be used for bulb.
* @return Christmas tree bulb with interactive support.
*/
private Circle createInteractiveBulb(
final int centerX, final int centerY, final int radius, final Paint paint)
{
final Circle bulb = new Circle(centerX, centerY, radius, paint);
bulb.setOnMouseClicked(
new EventHandler<MouseEvent>()
{
@Override
public void handle(MouseEvent mouseEvent)
{
bulb.setEffect(new Glow(1.0));
bulb.setRadius(bulb.getRadius() + 5);
}
});
return bulb;
}

/**
* Add colored circles (bulbs) to the provided Group.
*
* @param group Group to which 'bulbs' are to be added.
*/
private void addBulbs(final Group group)
{
final Circle bulbOne = createInteractiveBulb(350,100,10, Color.RED);
group.getChildren().add(bulbOne);
final Circle bulbTwo = createInteractiveBulb(285,210,10, Color.YELLOW);
group.getChildren().add(bulbTwo);
final Circle bulbThree = createInteractiveBulb(325,300,10, Color.WHITE);
group.getChildren().add(bulbThree);
final Circle bulbFour = createInteractiveBulb(475,290,10, Color.BLUE);
group.getChildren().add(bulbFour);
final Circle bulbFive = createInteractiveBulb(380,150,10, Color.CADETBLUE);
group.getChildren().add(bulbFive);
final Circle bulbSix = createInteractiveBulb(550,390,10, Color.VIOLET);
group.getChildren().add(bulbSix);
final Circle bulbSeven = createInteractiveBulb(375,400,10, Color.GOLD);
group.getChildren().add(bulbSeven);
final Circle bulbEight = createInteractiveBulb(445,195,10, Color.SILVER);
group.getChildren().add(bulbEight);
final Circle bulbNine = createInteractiveBulb(220,385,10, Color.DARKSALMON);
group.getChildren().add(bulbNine);
}

/**
* Add text portions to Christmas Tree group.
*
* @param group Group for text to be added to.
*/
private void addText(final Group group)
{
final Text text1 = new Text(25, 125, "Merry\nChristmas!");
text1.setFill(Color.RED);
text1.setFont(Font.font(java.awt.Font.SERIF, 50));
group.getChildren().add(text1);

final Text text2 = new Text(600, 150, "2011");
text2.setFill(Color.DARKGREEN);
text2.setFont(Font.font(java.awt.Font.SERIF, 75));
group.getChildren().add(text2);
}

/**
* Starting method of JavaFX application.
*
* @param stage Primary stage.
* @throws Exception Thrown for exceptional circumstances.
*/
@Override
public void start(final Stage stage) throws Exception
{
stage.setTitle("JavaFX 2.0: Christmas Tree 2011");
final Group rootGroup = new Group();
final Scene scene = new Scene(rootGroup, 800, 600, Color.WHITE);
stage.setScene(scene);
rootGroup.getChildren().add(buildChristmasTreePath());
rootGroup.getChildren().add(buildStumpPath());
addBulbs(rootGroup);
addText(rootGroup);
stage.show();
}

/**
* Main function that kicks off this JavaFX demonstrative application.
*
* @param arguments Command-line arguments; none expected.
*/
public static void main(final String[] arguments)
{
Application.launch(arguments);
}
}

This is no masterpiece, but the finished result is shown in the next two screen snapshots. The first image shows the application when it starts and the second image shows it after a few bulbs have been clicked on. I clicked on the bottom right bulb several times to make it much larger.

This blog post has demonstrated simple use of some of the classes in the javafx.scene.shape package. My drawing skills leaves something to be desired, but the example does illustrate use of these JavaFX 2.0 APIs. Although I did not show it here, use of SVGPath could be valuable for generating shapes generated with a tool like Inkscape.

Thứ Sáu, 23 tháng 12, 2011

(Pure Java) JavaFX 2.0 Menus

In recent posts on JavaFX, I have focused on using JavaFX 2.0's new Java APIs without use of the JavaFX 1.x's JavaFXScript and without use of JavaFX 2.0's new FXML. All of these examples have been compiled with the standard Java compiler and executed with the standard Java launcher. In this post, I continue the theme of using pure Java APIs supported by JavaFX 2.0 while demonstrating development of JavaFX 2.0 menus.

I list the entire code listing for this example later in this post, but I first show snippets of the code to make it easier to focus on each piece. A good starting point for using JavaFX 2.0 menus is to instantiate an instance of MenuBar. This is straightforward as shown next.

Instantiating a javafx.scene.control.MenuBar

final MenuBar menuBar = new MenuBar();

A MenuBar can contain Menu instances as its children and each Menu instance can have instances of MenuItem as its children. The next code listing demonstrates instantiation of a Menu, adding of MenuItem instances (or an instance of SeparatorMenuItem) to that Menu instance, and then adding the Menu instance to the instance of MenuBar.

Adding Newly Instantiated Menu and MenuItem Instances to MenuBar

// Prepare left-most 'File' drop-down menu
final Menu fileMenu = new Menu("File");
fileMenu.getItems().add(new MenuItem("New"));
fileMenu.getItems().add(new MenuItem("Open"));
fileMenu.getItems().add(new MenuItem("Save"));
fileMenu.getItems().add(new MenuItem("Save As"));
fileMenu.getItems().add(new SeparatorMenuItem());
fileMenu.getItems().add(new MenuItem("Exit"));
menuBar.getMenus().add(fileMenu);

The example above is too simplified for realistic uses. There are no event handlers or actions associated with clicking on any of the menu items and there are no ways to select the menu items via keystroke rather than via mouse clicking. The next code listing demonstrates instantiation of MenuItem instances that include more than just a text string. In this code listing, there is an example of using MenuItemBuilder to build a much more complex MenuItem that includes association to a key combination and includes an association to an action handler.

More Sophisticated MenuItem Instantiation with Keystroke and Event Associations

// Prepare 'Help' drop-down menu
final Menu helpMenu = new Menu("Help");
final MenuItem searchMenuItem = new MenuItem("Search");
searchMenuItem.setDisable(true);
helpMenu.getItems().add(searchMenuItem);
final MenuItem onlineManualMenuItem = new MenuItem("Online Manual");
onlineManualMenuItem.setVisible(false);
helpMenu.getItems().add(onlineManualMenuItem);
helpMenu.getItems().add(new SeparatorMenuItem());
final MenuItem aboutMenuItem =
MenuItemBuilder.create()
.text("About")
.onAction(
new EventHandler<ActionEvent>()
{
@Override public void handle(ActionEvent e)
{
out.println("You clicked on About!");
}
})
.accelerator(
new KeyCodeCombination(
KeyCode.A, KeyCombination.CONTROL_DOWN))
.build();
helpMenu.getItems().add(aboutMenuItem);
menuBar.getMenus().add(helpMenu);

Besides demonstrating MenuItemBuilder, associating a key combination (CTRL-A in this case) with a menu item, and associating an action with a menu item, this code example also demonstrates making a menu item disabled (grayed out) with setDisable(boolean) or making it not appear at all with setVisible(boolean). Although I could have specified disabling the menu item or making the menu item invisible with a MenuItemBuilder, I intentionally used "set" methods on the MenuItems in this example to contrast that approach with using the MenuItemBuilder.

For completeness, here is the entire code listing of my example.

JavaFxMenus.java (The Complete Listing)

package dustin.examples;

import static java.lang.System.out;

import javafx.application.Application;
import javafx.beans.property.ReadOnlyDoubleProperty;
import javafx.event.ActionEvent;
import javafx.event.EventHandler;
import javafx.scene.Group;
import javafx.scene.Scene;
import javafx.scene.control.*;
import javafx.scene.input.KeyCode;
import javafx.scene.input.KeyCodeCombination;
import javafx.scene.input.KeyCombination;
import javafx.scene.paint.Color;
import javafx.stage.Stage;

/**
* Example of creating menus in JavaFX.
*
* @author Dustin
*/
public class JavaFxMenus extends Application
{
/**
* Build menu bar with included menus for this demonstration.
*
* @param menuWidthProperty Width to be bound to menu bar width.
* @return Menu Bar with menus included.
*/
private MenuBar buildMenuBarWithMenus(final ReadOnlyDoubleProperty menuWidthProperty)
{
final MenuBar menuBar = new MenuBar();

// Prepare left-most 'File' drop-down menu
final Menu fileMenu = new Menu("File");
fileMenu.getItems().add(new MenuItem("New"));
fileMenu.getItems().add(new MenuItem("Open"));
fileMenu.getItems().add(new MenuItem("Save"));
fileMenu.getItems().add(new MenuItem("Save As"));
fileMenu.getItems().add(new SeparatorMenuItem());
fileMenu.getItems().add(new MenuItem("Exit"));
menuBar.getMenus().add(fileMenu);

// Prepare 'Examples' drop-down menu
final Menu examplesMenu = new Menu("JavaFX 2.0 Examples");
examplesMenu.getItems().add(new MenuItem("Text Example"));
examplesMenu.getItems().add(new MenuItem("Objects Example"));
examplesMenu.getItems().add(new MenuItem("Animation Example"));
menuBar.getMenus().add(examplesMenu);

// Prepare 'Help' drop-down menu
final Menu helpMenu = new Menu("Help");
final MenuItem searchMenuItem = new MenuItem("Search");
searchMenuItem.setDisable(true);
helpMenu.getItems().add(searchMenuItem);
final MenuItem onlineManualMenuItem = new MenuItem("Online Manual");
onlineManualMenuItem.setVisible(false);
helpMenu.getItems().add(onlineManualMenuItem);
helpMenu.getItems().add(new SeparatorMenuItem());
final MenuItem aboutMenuItem =
MenuItemBuilder.create()
.text("About")
.onAction(
new EventHandler<ActionEvent>()
{
@Override public void handle(ActionEvent e)
{
out.println("You clicked on About!");
}
})
.accelerator(
new KeyCodeCombination(
KeyCode.A, KeyCombination.CONTROL_DOWN))
.build();
helpMenu.getItems().add(aboutMenuItem);
menuBar.getMenus().add(helpMenu);

// bind width of menu bar to width of associated stage
menuBar.prefWidthProperty().bind(menuWidthProperty);

return menuBar;
}

/**
* Start of JavaFX application demonstrating menu support.
*
* @param stage Primary stage.
*/
@Override
public void start(final Stage stage)
{
stage.setTitle("Creating Menus with JavaFX 2.0");
final Group rootGroup = new Group();
final Scene scene = new Scene(rootGroup, 800, 400, Color.WHEAT);
final MenuBar menuBar = buildMenuBarWithMenus(stage.widthProperty());
rootGroup.getChildren().add(menuBar);
stage.setScene(scene);
stage.show();
}

/**
* Main executable function for running examples.
*
* @param arguments Command-line arguments: none expected.
*/
public static void main(final String[] arguments)
{
Application.launch(arguments);
}
}

The next series of screen snapshots attempt to demonstrate what this application looks like when executed using the java launcher. The images show the initial appearance of the application, the drop-down menu presented when "File" menu is clicked on, the drop-down menu presented when the "Help" menu is clicked on, and finally an image that shows the message written to standard output when the "About" menu item is clicked on under the "Help" menu.

The code in the example featured in this post has numerous syntax features that should look familiar to Swing developers. In fact, many of the JavaFX classes used above have the same names as AWT classes and so care must be used to import the correct class when using the IDE's automatic import suggestions.

The example above also provides an example of JavaFX binding. In particular, the width of the menu bar is bound to the width of the stage's width. This is useful because it looks better to have the menu bar span the entire top of the visual rather than being just wide enough to hold the menu labels.

Building menus is fairly straightforward in JavaFX 2.0 and can be implemented using basic Java tools and the JavaFX 2.0 JAR.

Thứ Năm, 22 tháng 12, 2011

JavaFX 2.0.2 Delivered with Java 7 Update 2

The JavaTM SE 7 Update 2 Release Notes state that this update contains "new JVM (Java HotSpot Virtual Machine, version 22) that improves reliability and performance" along with support for Oracle Solaris 11 and "Firefox 5 and later". Perhaps most interesting of the update's new features, however, is "JavaFX is included with Java SE." These Java 7 Update 2 release notes reference the JavaFX 2.0.2 Release Notes for more details on the version of JavaFX included with Java 7 Update 2. The JavaFX 2.0.2 Release Notes confirm the inclusion of this version of JavaFX with Java 7 Update 2. Specifically, these notes state, "Note that starting with Java SE 7 update 2, the JDK includes the JavaFX SDK and the JavaFX Runtime is installed along with the JRE."

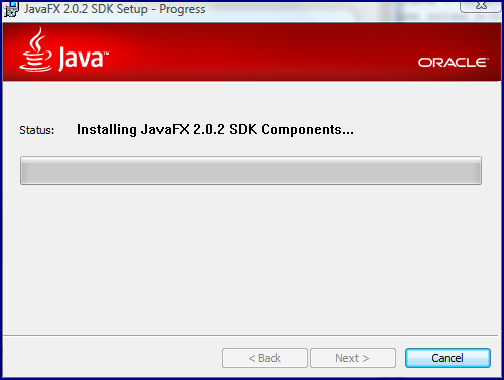
The following images are screen snapshots taken of the Java 7 Update 2 installation process.

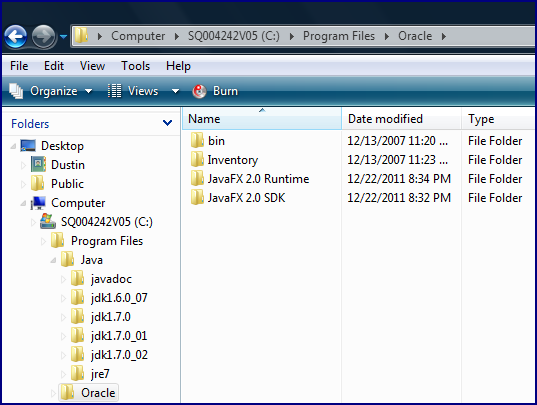
Once the JDK 7 Update 2 installation process is completed with JavaFX 2.0.2 installed immediately after the Java JDK installation, the JavaFX SDK and runtime are available at C:\Program Files\Oracle as shown in the next screen snapshot.

As the above screen snapshots demonstrate, the JavaFX 2 JARs still need to be explicitly listed on the classpath because even with their installation as part of JDK 7 Update 2, they are installed in separate directories not automatically included in the Java applications' classpath. This is not as convenient as it will be when JavaFX is formerly included in Java SE and JavaFX classes do not need to be placed explicitly on the classpath, but being able to download JavaFX SDK with the Java SE SDK is a minor convenience.

Java 7's ThreadLocalRandom

Java 7 brings many new language features and new classes to the Java developer. One of the new classes included in Java 7's new concurrency offerings is ThreadLocalRandom (located in the java.util.concurrent package). ThreadLocalRandom extends java.util.Random, but intentionally does not support the explicit setting of seed its parent class supports.

ThreadLocalRandom prohibits explicit setting of its seed by overriding Random's setSeed(long) method and automatically (always) throwing an UnsupportedOperationException if called. Although ThreadLocalRandom encourages more true randomness by prohibiting explicit seeds, this can be achieved in Random by simply avoiding explicit setting of seeds. The real advantage that ThreadLocalRandom brings is performance in concurrent applications.

The Javadoc documentation for the java.util.Random class states, "Instances of java.util.Random are threadsafe. However, the concurrent use of the same java.util.Random instance across threads may encounter contention and consequent poor performance. Consider instead using ThreadLocalRandom in multithreaded designs." The Javadoc documentation for java.util.concurrent.ThreadLocalRandom expands on this:

A random number generator isolated to the current thread. Like the global Random generator used by the Math class, a ThreadLocalRandom is initialized with an internally generated seed that may not otherwise be modified. When applicable, use of ThreadLocalRandom rather than shared Random objects in concurrent programs will typically encounter much less overhead and contention. Use of ThreadLocalRandom is particularly appropriate when multiple tasks (for example, each a ForkJoinTask) use random numbers in parallel in thread pools.

The ThreadLocalRandom class is easy to use and one approach is shown in the next code listing. The code listing provides enough methods to compare Random to ThreadLocalRandom using an explicit seed in each case and relying on implicit seeding in each case.


package dustin.examples;

import static java.lang.System.out;

import java.util.Random;
import java.util.concurrent.ThreadLocalRandom;

/**
* Simple demonstration of Random and ThreadLocalRandom.
*
* @author Dustin
*/
public class Main
{
/**
* Provide a random integer.
*
* @return Random integer.
*/
public int getRandomInteger()
{
final Random random = new Random();
return random.nextInt();
}

/**
* Provide a random integer using provided seed.
*
* @param newSeed Seed to be used in acquiring random integer.
* @return Random integer.
*/
public int getRandomIntegerUsingProvidedSeed(final int newSeed)
{
final Random random = new Random(newSeed);
return random.nextInt();
}

/**
* Provide a random integer using ThreadLocalRandom. Note that it has no
* constructor.
*
* @return Random integer.
*/
public int getThreadLocalRandomInteger()
{
return ThreadLocalRandom.current().nextInt();
}

/**
* Demonstrates that attempting to set the seed for a ThreadLocalRandom
* instance results in an UnsupportedOperationException.
*
* @param newSeed Seed to attempt to use with ThreadLocalRandom.
* @return Would return random integer, but should never reach this because
* UnsupportedOperationException should occur when attempting to set
* provided seed.
* @throws UnsupportedOperationException This exception is always thrown!
*/
public int getThreadLocalRandomIntegerUsingProvidedSeed(final int newSeed)
{
final ThreadLocalRandom random = ThreadLocalRandom.current();
random.setSeed(newSeed);
return random.nextInt();
}

/**
* Run examples.
*
* @param arguments Command-line arguments; none expected.
*/
public static void main(final String[] arguments)
{
final int sampleSeed = 15;
final Main me = new Main();
out.println("Random Integer: " + me.getRandomInteger());
out.println("Seeded Random Integer: " + me.getRandomIntegerUsingProvidedSeed(sampleSeed));
out.println("Thread Local Random Integer: " + me.getThreadLocalRandomInteger());
out.println( "Seeded Thread Local Random Integer: "
+ me.getThreadLocalRandomIntegerUsingProvidedSeed(sampleSeed));
}
}

The next screen snapshot shows the output of running the above code twice. The output demonstrates that using the same seed leads to the same "random" integer when using Random. It also demonstrates that ThreadLocalRandom does not allow the explicit setting of a seed. Unlike Random, the ThreadLocalRandom class does not provide a constructor taking the seed (in fact, it provides no constructor at all). With no constructor accepting a seed, the setSeed(long) method declared by parent Random class was the remaining approach for setting a seed explicitly. ThreadLocalRandom shuts this option down via the overridden implementation that throws the UnsupportedOperationException.

ThreadLocalRandom is a simple addition to the Java SDK, but is an improvement that can occasionally be welcome when using random numbers in highly concurrent applications.

Thứ Năm, 15 tháng 12, 2011

Simple JavaFX 2.0 Text Example

Oracle announced at JavaOne 2010 that they would be deprecating JavaFX Script and changing JavaFX to support standard Java APIs. In my previous post Hello JavaFX 2.0: Introduction by Command Line, I demonstrated that JavaFX 2.0 has definitely put the 'Java' back into JavaFX. This post continues that theme, showing examples of rendering various text effects, fonts, and sizes via JavaFX 2.0 using "pure Java" APIs. The example in this post can be compiled with the javac compiler and run with the java application launcher (assuming appropriate JavaFX library is available in classpath in both cases).

The JavaFX APIs for programmatically handling text in JavaFX 2.0 are easy to use for basic applications, but provide support for more sophisticated effects as the developer becomes comfortable with the APIs. The examples shown in the single application featured in this post are relatively straightforward and likely require little explanation.


package dustin.examples;

import javafx.application.Application;
import javafx.scene.Group;
import javafx.scene.Scene;
import javafx.scene.effect.*;
import javafx.scene.paint.Color;
import javafx.scene.text.Font;
import javafx.scene.text.FontWeight;
import javafx.scene.text.Text;
import javafx.stage.Stage;

/**
* Simple demonstration of JavaFX text support.
*
* @author Dustin
*/
public class JavaFxText extends Application
{
/**
* Start demonstration of JavaFX text capabilities.
*
* @param stage Stage for JavaFX application.
* @throws Exception Exception in JavaFX application.
*/
@Override
public void start(final Stage stage) throws Exception
{
stage.setTitle("Simplistic Example of JavaFX 2.0 Text Capabilities");
final Group rootGroup = new Group();
final Scene scene =
new Scene(rootGroup, 800, 400, Color.BEIGE);

final Text text1 = new Text(25, 25, "(2007) JavaFX based on F3");
text1.setFill(Color.CHOCOLATE);
text1.setFont(Font.font(java.awt.Font.SERIF, 25));
rootGroup.getChildren().add(text1);

final Text text2 = new Text(25, 50, "(2010) JavaFX Script Deprecated");
text2.setFill(Color.DARKBLUE);
text2.setFont(Font.font(java.awt.Font.SANS_SERIF, 30));
rootGroup.getChildren().add(text2);

final Text text3 = new Text(25, 75, "(2011) JavaFX to be Open Sourced!");
text3.setFill(Color.TEAL);
text3.setFont(Font.font(java.awt.Font.MONOSPACED, 35));
rootGroup.getChildren().add(text3);

final Text text4 = new Text(25, 125, "(2011) JavaFX to be Standardized");
text4.setFill(Color.CRIMSON);
text4.setFont(Font.font(java.awt.Font.DIALOG, 40));
final Effect glow = new Glow(1.0);
text4.setEffect(glow);
rootGroup.getChildren().add(text4);

final Text text5 = new Text(25, 175, "(Now) Time for JavaFX 2.0!");
text5.setFill(Color.DARKVIOLET);
text5.setFont(Font.font(java.awt.Font.SERIF, FontWeight.EXTRA_BOLD, 45));
final Light.Distant light = new Light.Distant();
light.setAzimuth(-135.0);
final Lighting lighting = new Lighting();
lighting.setLight(light);
lighting.setSurfaceScale(9.0);
text5.setEffect(lighting);
rootGroup.getChildren().add(text5);

final Text text6 = new Text(25, 225, "JavaFX News at JavaOne!");
text6.setFill(Color.DARKGREEN);
text6.setBlendMode(BlendMode.COLOR_BURN);
text6.setFont(Font.font(java.awt.Font.DIALOG_INPUT, FontWeight.THIN, 45));
final Reflection reflection = new Reflection();
reflection.setFraction(1.0);
text6.setEffect(reflection);
rootGroup.getChildren().add(text6);

stage.setScene(scene);
stage.show();
}

/**
* Main JavaFX application launching method.
*
* @param arguments Command-line arguments: none expected.
*/
public static void main(final String[] arguments)
{
Application.launch(arguments);
}
}

All of the interesting code occurs in the overridden start(Stage) method of this class that extends Application. Different effects (glow, lighting, reflection), font sizes, and font types are demonstrated in this example. The output from running this application from the command line is shown next.

The example highlighted in this post demonstrates a subset of JavaFX 2.0's support for text rendering. It also is another example of how JavaFX 2.0 has made JavaFX readily available via Java APIs.